Friday, December 30, 2011

50 Watt Amplifier

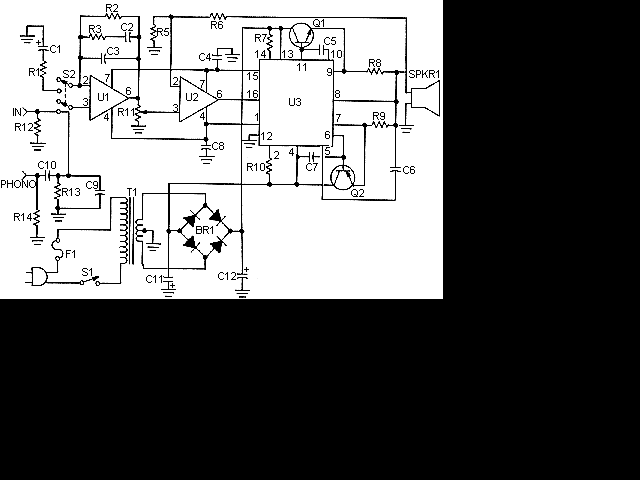
Schematic

This is the schematic of the 50 Watt Amp

Parts

Part
Total Qty.
Description
Substitutions
R11200 Ohm 1/4 W Resistor
R21200K 1/4 W Resistor
R3130K 1/4 W Resistor
R511K 1/4 W Resistor
R615K 1/4 W Resistor
R7,R1021 Meg (5%) 1/2 W Resistor
R8,R920.4 Ohm 5 W Resistor
R11110K Pot
R12,R13251K 1/4 W Resistor
R14147K 1/4 W Resistor
C11100uF 35V Electrolytic Capacitor
C210.011uF Capacitor
C313750pF Capacitor
C4,C621000pF Capacitor
C5,C7,C830.001uF Capacitor
C9150pF Capacitor
C1010.3uF Capacitor
C11,C12210,000uF 50V Electrolytic Capacitor
U1,U22741 Op Amp
U31ICL8063 Audio Amp Transister Driver thingy
Q112N3055 NPN Power Transistor
Q212N3791 PNP Power Transistor
BR11250 V 6 Amp Bridge Rectifier
T1150V Center Tapped 5 Amp Transformer
S11SPST 3 Amp Switch
S21DPDT Switch
F112 Amp Fuse
SPKR118 Ohm 50W Speaker
MISC1Case, Knobs, Line Cord, Binding Posts Or Phono Plugs (For Input And Output), Heatsinks For Q1 And Q2

Notes

  1. I know I skipped R4. That is not a problem :-)
  2. Distortion is less than 0.1% up to 100HZ and increases to about 1% at 20kHz.
  3. I haven't been able to find anyone who sells a suitable T1. You can always use two 24V 5A units in series. If you are building two amps (for stereo), then I would suggest using an old microwave transformer and rewinding it. Follow the instructions in the 12V To 120V Inverter, execpt wind 26 turns, twist a loop (center tap) and wind 26 more turns. That should work out to around 50 volts. You may need to add or remove turns depending on your transformer.
  4. Q1 and Q2 will require heatsinks.
  5. You may have trouble finding U3 because it is discontinued. Please don't email me about sources...I can't find it either. See if any of the sources in Where To Get Parts has it. A possible source was sent in by JBWilliams:
    Zigma Electronics
    8803 Shirless Ave.
    Northbridge, CA 91324
    United States
    Phone: 818-772-7590
    

design Infa-Red Remote Control


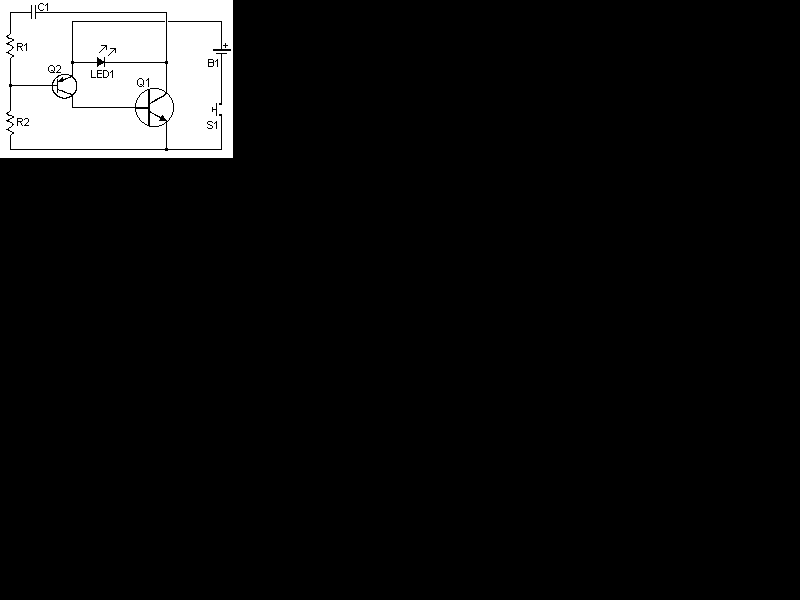
Schematic For Transmitter


This is the schematic of the IR Transmitter


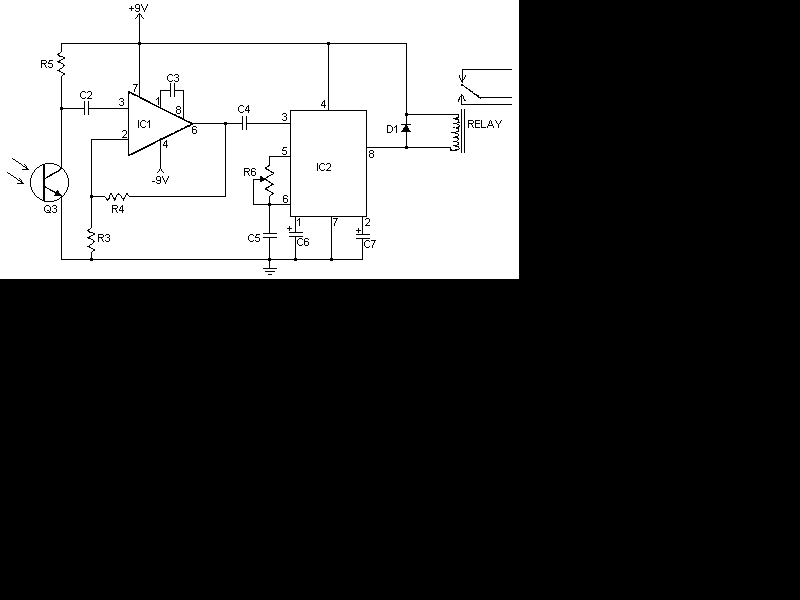
Schematic For Receiver


This is the schematic for the IR Receiver 

<><><><> <><><><><> <><><><> <><><><><><><><><> <><><><><><><><><> <><><><><><><><><> <><><><><> <><><><> <><><><><> <><><><> <><><><><><><><><> <><><><><><><><><> <><><><><><><><><> <><><><><> <><><><> <><><><><> <><><><> <><><><><><><><><> <><><><><><><><><> <><><><><><><><><> <><><><><> <><><><> <><><><><> <><><><> <><><><><><><><><> <><><><><><><><><> <><><><><><><><><> <><><><><> <><><><> <><><><><> <><><><> <><><><><><><><><> <><><><><><><><><> <><><><><><><><><> <><><><><> <><><><> <><><><><> <><><><> <><><><><><><><><> <><><><><><><><><> <><><><><><><><><> <><><><><> <><><><> <><><><><> <><><><> <><><><><><><><><> <><><><><><><><><> <><><><><><><><><> <><><><><> <><><><> <><><><><> <><><><> <><><><><><><><><> <><><><><><><><><> <><><><><><><><><> <><><><><> <><><><> <><><><><> <><><><> <><><><><><><><><> <><><><><><><><><> <><><><><><><><><> <><><><><> <><><><> <><><><><> <><><><> <><><><><><><><><> <><><><><><><><><> <><><><><><><><><> <><><><><> <><><><> <><><><><> <><><><> <><><><><><><><><> <><><><><><><><><> <><><><><><><><><> <><><><><> <><><><> <><><><><> <><><><> <><><><><><><><><> <><><><><><><><><> <><><><><><><><><> <><><><><> <><><><> <><><><><> <><><><> <><><><><><><><><> <><><><><><><><><> <><><><><><><><><> <><><><><> <><><><> <><><><><> <><><><> <><><><><><><><><> <><><><><><><><><> <><><><><><><><><> <><><><><> <><><><> <><><><><> <><><><> <><><><><><><><><> <><><><><><><><><> <><><><><><><><><> <><><><><> <><><><> <><><><><> <><><><> <><><><><><><><><> <><><><><><><><><> <><><><><><><><><> <><><><><> <><><><> <><><><><> <><><><> <><><><><><><><><> <><><><><><><><><> <><><><><><><><><> <><><><><> <><><><> <><><><><> <><><><> <><><><><><><><><> <><><><><><><><><> <><><><><><><><><> <><><><><> <><><><> <><><><><> <><><><> <><><><><><><><><> <><><><><><><><><> <><><><><><><><><> <><><><><> <><><><> <><><><><> <><><><> <><><><><><><><><> <><><><><><><><><> <><><><><><><><><> <><><><><> <><><><> <><><><><> <><><><> <><><><><><><><><> <><><><><><><><><> <><><><><><><><><> <><><><><> <><><><> <><><><><> <><><><> <><><><><><><><><> <><><><><><><><><> <><><><><><><><><> <><><><><> <><><><> <><><><><> <><><><> <><><><><><><><><> <><><><><><><><><> <><><><><><><><><> <><><><><> <><><><> <><><><><> <><><><> <><><><><><><><><> <><><><><><><><><> <><><><><><><><><> <><><><><>


Part


Total Qty.


Description


Substitutions
R1122K 1/4W Resistor
R211 Meg 1/4W Resistor
R311K 1/4W Resistor
R4, R52100K 1/4W Resistor
R6150K Pot
C1, C220.01uF 16V Ceramic Disk Capacitor
C31100pF 16V Ceramic Disk Capacitor
C410.047uF 16V Ceramic Disk Capacitor
C510.1uF 16V Ceramic Disk Capacitor
C613.3uF 16V Electrolytic Capacitor
C711.5uF 16V Electrolytic Capacitor
Q112N2222 NPN Silicon Transistor2N3904
Q212N2907 PNP Silicon Transistor
Q31NPN Phototransistor
D111N914 Silicon Diode
IC11LM308 Op Amp IC
IC21LM567 Tone Decoder
LED11Infa-Red LED
RELAY16 Volt Relay
S11SPST Push Button Switch
B113 Volt BatteryTwo 1.5V batteries in series
MISC1Board, Sockets For ICs, Knob For R6, Battery Holder
RELAY16 Volt Relay

Infra Red Switch

Description:
This is a single channel (on / off) universal switch that may be used with any Infra Red remote control using 36-38kHz. (This is a very common remote handset frequency). In place of IR1 a TSOP1738 receiver may be used.

IR Switch


Notes
Any "button" of any remote control may be used to work this universal switch. The button must be pressed for about one and a half seconds (determined by R3 and C2) before the relay will operate. The circuit will remain in this state (latched) until reset. To reset, any button is pressed on the remote handset and held for a short duration.
For example, if you were watching TV, you could press and hold any button on the TV remote to trigger the circuit. In order not to change channel, you could press the button of the channel you are watching. You can connect anything to the relay, for example a lamp, but make sure that the relay contacts can handle the rated voltage and current.

Circuit :
IC1 is an Infra Red module. IR modulated pulses are received and buffered by this IC. It has a standard TTL output, the output with no signal is held high by R1. A replacement for IR1 is the common TSOP1738 IR reciver. One gate of a CMOS inverter drives LED1 as a visible switching aid. Another gate buffers the signal and applies it to the time constant circuit, comprising R3,C2,R4 and D1. C2 charges via R3, and discharges via R4, D1 prevents quick discharge via the low output impedance of the CMOS buffer. If using a TSOP1738 then increase R4 to 470k.

The time taken to charge a capacitor is the product of resistance and capacitance, more commonly known as the RC time constant. At one RC a capacitor will only charge to 63% of the supply voltage. It takes 5 RC's for a capacitor to reach 99% charge. In this circuit the capacitor charge has to reach the logic threshold of the CMOS invertor. As the power supply is 5 Volts, the input threshold is around 3.6V, which takes about 3RC's or about 1.5 seconds. Once reached the inventor triggers the 555 timer and operates the flip flop. A simulation of received pulses, filtering and output pulse is shown below. Note that this is not from the actual circuit ( in which case the reconstructed pulse would be high for the duration of the 555 monostable) but only a spice simulation.

IR pulses


The pulses are further buffered and contain "jaggered edges" as shown above. These edges are produced by the modulated IR data, and have to be removed. This is achieved using a 555 timer wired as a monostable, IC3, having an output pulse duration R5, C4. A clean output pulse is produced to activate the bistable latch, IC4. This is a D type flip flop, built with a TTL 7474 series IC and configured as a bistable. Any version of the 7474 may be used, i.e. schottky 74LS74, high speed 74HCT74 etc. The input is applied to the clock pin, the inverted output fed back to the data input and clear and preset lines are tied to ground. For every pulse the relay will operate and latch, the next pulse will turn off the relay and so on. Note that quick turn on and off of the relay is not possible. The output pulse is set at about 2.4 seconds. and input delay by R3, C2 set about 1.5 seconds.

Parts List:
R1 3k3
R2 1k
R3 22k
R4 220k or 470k if using a TSOP1738
R5 1M
R6 3k3
B1 12 V
D1 1N4148
D2 1N4003
Q1 B109
LED1 CQX35A
IC1 IR1 available from Harrison Electronics or TSOP1838 or similar
IC2 4049
IC3 CA555
IC4 SN74HCT74 or SN74LS74
IC5 LM7805
Relay 12 Volt coil with changeover contact
C1 100u
C2 22u
C3 100n
C4 2u2

Infrared gate

description

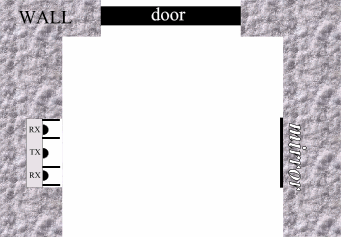
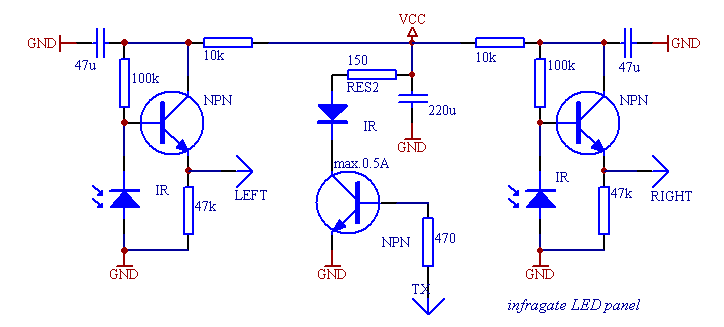
This is an infrared gate with two sensors planned to use in the wall in the way behind a door. It can be applied in a toilet to keep track of that someone is inside exceeding a certain amount of time. After that time elapsed, the circuit triggers the digital output wich can turn on a ventillator. The time period the output is turned on can be separately controlled by a second timer.
If you plan to build this circuit, beware that you may have lots of difficulties though the schematic may seem simple. The construction of the circit requires some amount of equipment like an oscilloscope and a DVM, too. Without them, the device will do weird things you wouldn't expect, and even if it is correctly put together, you must adjust it with care both mechanically in its final place and electronically with the help of an oscilloscope. Only if you want to span about less than 20-30 inches with the infra diodes can forget about this calibration. Alternatively you can take ideas from this construction.

Schematics

The device consists of several parts, the most critical one is the panel with the infra LEDs. I tried to use several receiver transistors, but best result was given by infra receiver diodes used in TV remote control receivers. The receiver diodes must be properly shielded from the transmitter LED(s) otherwise the infra light will surely drive the receiver with a large enough signal. These photodiodes should only see infrared light coming from the mirror. The two very sensitive receiver parts should also be isolated from the transmitter electrically or the TX signal will get across the wires to the RX lines, which results the same effect as weak optical shielding. Use metal shielding around the receiver amplifiers where possible. The infrared transmitter LEDs should be close in wavelength to the max. sensitivity band of the receivers. You can experiment with using more LEDs and more current testing several resistor values, but don't exceed the 500 mA current limit flowing on the diodes or they will burn out. Do not shield the transmitters, allow the maximum amount of infralight to reach the mirror to extend the possible range.
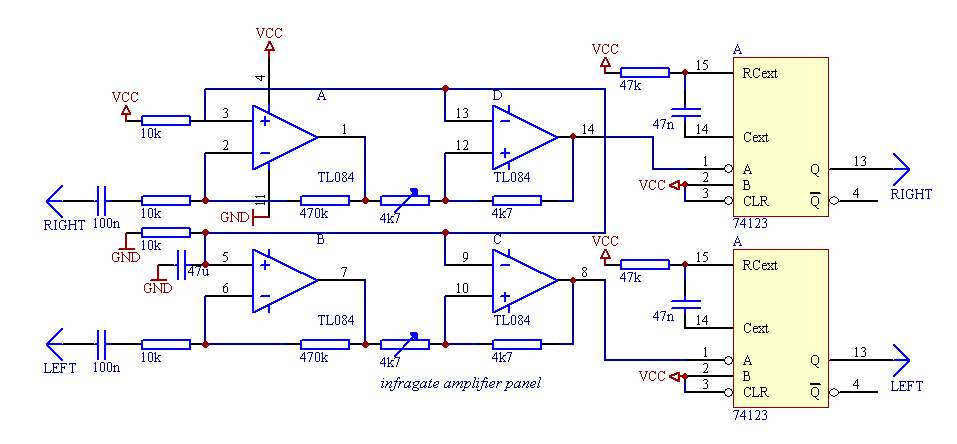
Update: The TTL IC called '74123' is actually a 74HC123, and is used out of the specifications - although it is rated up to 7VDC supply voltage as absolute maximum, in this project it is powered from VCC=9-12VDC without problems. I am ashamed of neglecting such an important aspect.
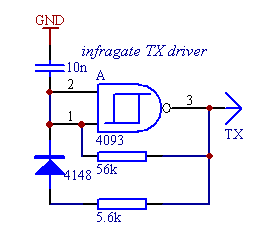
To start testing the infra LED panel, you wil need the infragate amplifier panel and the small transmiter driver. The TX driver will generate the digital signal for the LED driver on the LED panel. The digital signal is 1:10 on/off to achive good performance with lower power dissipation on the LEDs. Connect GND, VCC planes and LEFT, RIGHT wires of the LED panel with the amplifier panel, and drive the TX line from the TX driver. Now you are able to start testing and calibrating the analogue part of the circuit. If everything is ok, holding a mirror in front of the LED panel will reflect enough signal to overdrive the amplifier and you can check the output on the OPA 1, 7 pins with an oscilloscope. Taking the mirror farther on will result a weakening signal on the amplifier output. Set the orientation of the diodes to be able to get the maximum signal amplitude on the oscilloscope screen. This is the heaviest part of the work, don't deal too much with it until the complete circuit is not built. Just adjust a static state of the construction to give the maximum signal amplitude on the output when nothing is between the diodes and the mirror and give a small noise only when the line of sight is covered. If you are ready with it, you can adjust the schmitt triggers built of the other two OPA parts to generate TTL pulses when the analog signal is at its maximum and stay on the same DC level when the received signal is missing.
It is also important to protect the receiver diodes from direct light as natural light will weaken the sensitivity of the diodes, and lamps will transform the 50/60 Hz modulation present in the line power. Small noise is not problem, but the received signal from the TX generator should be stronger to be able to detect it. After the ST adjustments, connect LEDs to the 74123's TTL outputs through proper value resistors. The 74123 here is used as a demodulator. If there is a periodic signal change on the input, the output will be high, while if there is no activity on the input for a given period of time, the output falls low. When you cover the line of sight of one receiver diode, the corresponding LED turns off. There should not be any flickering in the turning on/off, the output should immediately respond to the change without blinking.
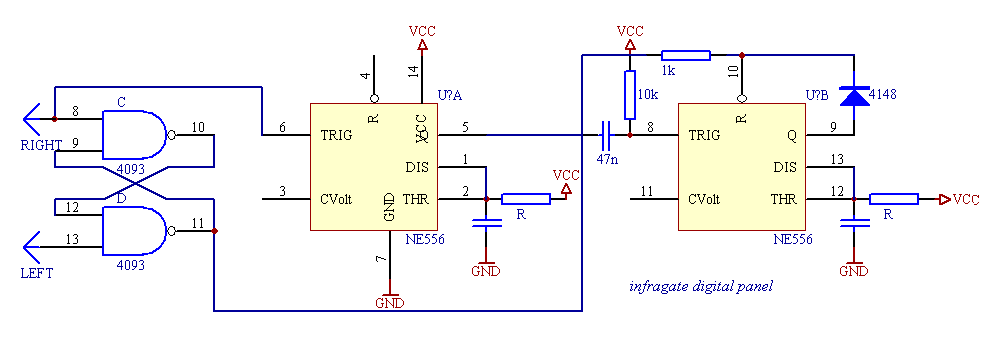
If still everything is correctly working at this point, the remaining digital circuit is the easy part of the work. The outputs of the previous circuit (LEFT, RIGHT) directly connect to the remaining part. The RS memory built from two NAND gates remembers the way of the last movement direction, so if someone is in or not. If you experience problems, connect another LED to pin 10 of the RS and check if this part does what it should. If there was any activity in the past minutes, the first timer is running, but it can only trigger the second timer part, if someone is still inside. The diode from the second timer output prevents resetting itself before the timing period is over in case of another movement. For a 1 minute timing (first timer) R=470k C=100u can be used, the second part would use R=1.5M C=470u for about a 15 minute timing (t=1.1RC). The output of the second timer (pin 9) can drive a relay activating the ventillator.

make an Audio Amplifiers

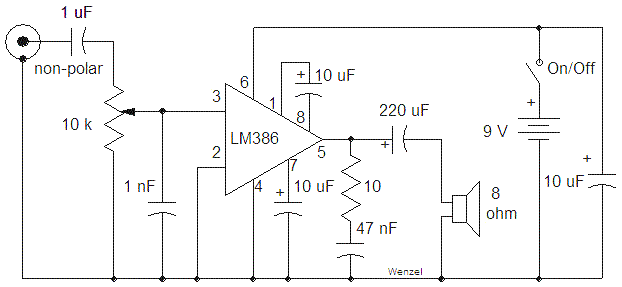
Simple LM386 Audio Amplifier
This simple amplifier shows the LM386 in a high-gain configuration (A = 200). For a maximum gain of only 20, leave out the 10 uF connected from pin 1 to pin 8. Maximum gains between 20 and 200 may be realized by adding a selected resistor in series with the same 10 uF capacitor. The 10k potentiometer will give the amplifier a variable gain from zero up to the maximum.

schematic

make Telephone Circuits

Telephone In-Use Indicator

 
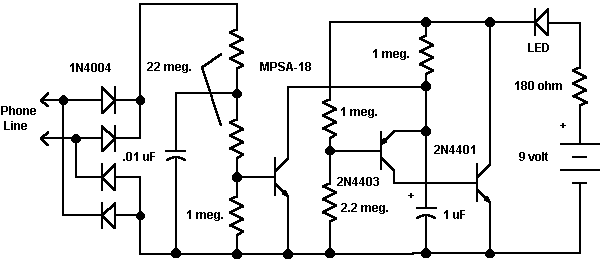
Phoneuse.gif (8699 bytes)
When a new computer modem enters the household, the demands on the home phone line skyrockets. The Internet surfer can use phone time on a par with the most talkative teenager. And the computer modem user can be quite sensitive about his privacy: simply lifting another receiver can knock him off-line causing emotional stress. The phone wiring may be modified so that the modem is always in control by connecting the phone line directly to the modem and connecting the rest of the phones to the modem's "phone" jack. But this solution gives the computer user too much power over the phone line and it doesn't solve the problem if two computers share a single line. Here is a simple blinking LED circuit which will alert users when the line is in use before the receiver is lifted. The circuit loads the phone line so lightly that it meets the on-hook telephone equipment leakage specification and the short lamp flashes draw very little current from the nine-volt battery. One of these devices may be placed at each extension without significantly loading the phone line. The circuit is connected to the red and green wires for a single-line system or the yellow and black wires for the second line in a two-line system. Polarity doesn't matter, thanks to the full-wave rectifier. In order to preserve your phone line balance, do not power this device from a line-powered power supply. Only use a battery as shown and insulate the battery and circuitry by building the device into a plastic case. Do not ground the circuitry. The circuit will work with other batteries and battery voltage. Four AA, C, or even D cells (6 volts) will last considerably longer if you have teenagers burning up your batteries. A small 9-volt rectangular battery will be fine for most users.
Notes:
bulletThe diode bridge eliminates polarity concerns. It may be left out but the wires to the phone line may need to be reversed if the circuit doesn't work properly.
bulletThe 22 megohm resistors are sufficiently high to meet phone circuit leakage specifications.
bulletA 2N4401 will usually work in place of the MPSA-18 but if the transistor gain is too low the flashing will not stop.

Telephone Ringer

Caution: The circuit generates a high voltage which can shock.
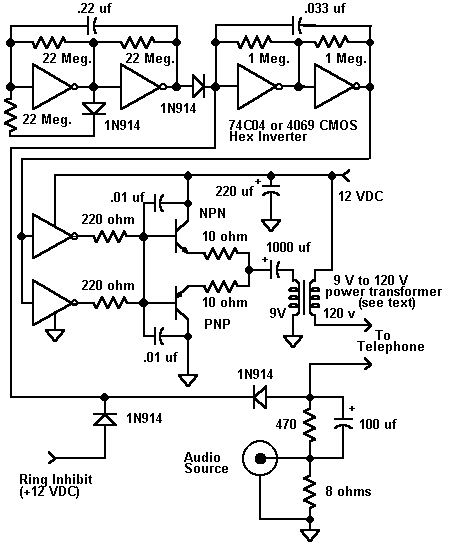
The Phone Ringer circuit will work with any ordinary phone including older bell ringer types. The circuit rings the phone in a completely realistic manner until someone answers. When the receiver is lifted the user hears the audio of your choice. It might be another telephone, a tape recording, a favorite talk radio show, a fake busy-signal, a scanner tuned to weather or police, cues for the actor who forgot his next line, or whatever audio source strikes your fancy. DC current is passed through the phone to activate the phone’s electronics.
Ringer.gif (13955 bytes)
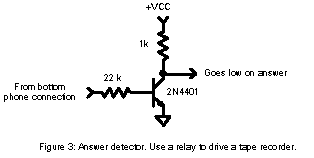
Provisions for experimenters include a ring inhibit control and an additional transistor will activate devices when the phone is answered. The ring inhibit control is used to start the ringing when a signal goes low and the activate-on-answer control can start a tape recording or other device when the phone is answered. For example, the ringer could be triggered by an alarm clock to make an artificial but realistic wake-up call. When you answer, your own voice instructs you about the importance of getting up. This wake-up caller is quite persistent, calling back the instant you hang up!
Do not connect this circuit or the phones used with this circuit to the phone lines.
The phone cable will have red and green wires which are simply connected to the points indicated by the schematic. Polarity should not matter. Other devices may be connected as described but no connection to a "real" phone line is intended.
The circuitry is simple and not particularly critical. The first two inverters form a slow pulse generator which controls the ringing rate. Change the 0.22 uf capacitor to change the ringing rate and change the 22 Meg. resistor in series with the diode to change the length of the ring. The second two inverters generate the 20 Hz ringing signal. This frequency can be changed by changing the .033uf capacitor. Mechanical bell ringers have a resonant clapper and should be driven with a frequency near 20 Hz but a slight variation may give a better ring. The last two inverters buffer the ringing signal and drive the two output transistors. Practically any transistors can be used for the output including 2N4401 and 2N4403 but power transistors in a TO-220 package might be more desirable if a lot of ringing is anticipated. The transistors should be capable of handling several hundred milliamperes. Any low-leakage signal diodes will work for the 1N914s.
The power transformer must handle 20 Hz with at least some efficiency so it is best to use larger units. Molded transformers will work fine but of course they cannot be DC types which have built-in rectifiers. Choose a transformer with a low voltage winding rated for an output voltage well below the DC power supply used. The circuit as shown runs on 12 volts with a 9 volt transformer. Some transformers have 220 volt windings which can give a stronger ring if necessary. A 6 volt filament transformer powered by the circuit as shown will give a quite strong ring. Reduce the 10 ohm emitter resistors to 4.7 ohms to get more ring power if power transistors are used . (Don't leave them out entirely since they help prevent high frequency oscillations.)
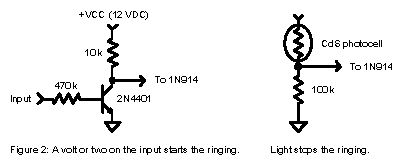
Ringfig2.gif (3724 bytes)
Ringing is inhibited by applying a voltage near VCC to the 1N914 diode. A simple transistor inverter can change the sense and increase the sensitivity so that a couple of volts will start the ringing (fig. 2). If the phone is to ring when the squelch of a modern scanner breaks try looking in the scanner for an analog switch integrated circuit. One of its pins will jump between 0 and 5 volts when the squelch breaks and this signal is fine for driving the inverter circuit. Fig. 2 also shows how to connect a photocell so that the phone rings only when the lights are off. (Record a dial tone so the victim concludes that the caller keeps hanging up just as he turns on the light.) The ringer control can also be used in a variety of other ways to automate the ringing. For example, a 470k pull-up resistor combined with a large electrolytic capacitor connected to ground makes an interesting doorbell. Just connect the doorbell switch across the capacitor and the phone will ring for a few seconds when the switch is pushed. (The capacitor discharges quickly but charges slowly.)
Ringfig3.gif (2798 bytes)
Fig. 3 shows how to add an answer activated control. The 1k resistor may be replaced with a relay for controlling a tape recorder. Put a diode across the winding to protect the transistor from inductive kick-back.
The phone ringer may be used to construct a pretend cellular phone system for the kids using an ordinary cordless phone and a regular phone wired in series. Keep the wiring neat and insulated so that the ring voltage doesn't "bite" anyone. Connect the ringer, ordinary phone and the base unit of the cordless phone in series. Wire a switch which enables the ringer and shorts the ordinary phone (two-pole switch). When the cordless phone is answered, flip the switch to talk. Shorting the ordinary phone is probably not necessary but be prepaired for a rather loud buzzing in the earpiece when the other phone rings! The advanced experimenter may wish to build an artificial phone system by adding a on-hook high voltage supply, dial tone oscillators, and appropriate switching circuitry. Quite a challange!

The Surfer’s Preserver

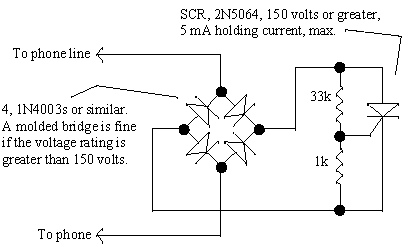
The Surfer’s Preserver is a simple device that prevents other phones in the house from disrupting your critical Internet session by disconnecting them from the line while you surf! The circuit is also useful in preventing eavesdropping from other extensions since other phones are "dead" until you hang up. The circuit wires in series with either of the offending phone’s wires (red or green) and it is small enough to tuck behind the wall cover plate.
Circuit Description: Due to the resistor divider, the SCR will not fire unless there is at least 17 volts across the bridge. When the receiver is lifted, the full line voltage appears across the circuit and the SCR triggers. The SCR will remain triggered since the DC phone current is about 25 mA and the SCR holding current is only about 5 mA. If the phone line is in use when the receiver is lifted, the line voltage is insufficient to trigger the SCR and the phone remains disconnected. When the phone rings, the 17 volt threshold is quickly passed and the SCR triggers early in the ring voltage cycle, supplying a nearly full amplitude ring voltage to the phone.
Surfer.gif (5793 bytes)
A momentary push-button switch may be added across the 33k resistor to manually trigger the SCR so that the phone can connect when another phone is off-hook. This push-button could be mounted in the wall plate if the plate is in a convenient location or the circuit could be built into the telephone itself with a small switch added on the side. This push-button is handy if more than one telephone is on the line.
Other SCRs may be substituted as long as their working voltage is above 150 volts and their holding current is well below your phone’s current. Connect a current meter in series with your phone to determine your current - expect about 25 to 30 mA.
The circuit requires that the modem or other phones pull the line voltage below 17 volts when off-hook. A simple voltage check will determine if the voltage is dropping low enough. It will typically drop to 5 volts. If you must raise the trigger voltage, increase the 33k resistor. A very high resistor value may reduce the ringing volume on older phones or prevent normal phone use.
A separate circuit may be constructed for each phone or one circuit may be used to disconnect several phones. To use one circuit for several phones, make sure that they share a common wire not shared with the modem. Place the circuit in series with the common wire. The advantage of this connection is that the push-button is not needed to transfer a call from one phone to another but some custom wiring may be necessary.

Simple Computer A/D Uses a Serial Port

Here is an inexpensive way to get slow-moving analog data directly into a spreadsheet on your computer! A simple circuit connects to a serial port and a short Qbasic program gathers and saves 12 bit data to a file. A spreadsheet automatically retrieves the file and displays the data in real time. Once the data is in the spreadsheet, the full power and flexibility of the office suite is available.

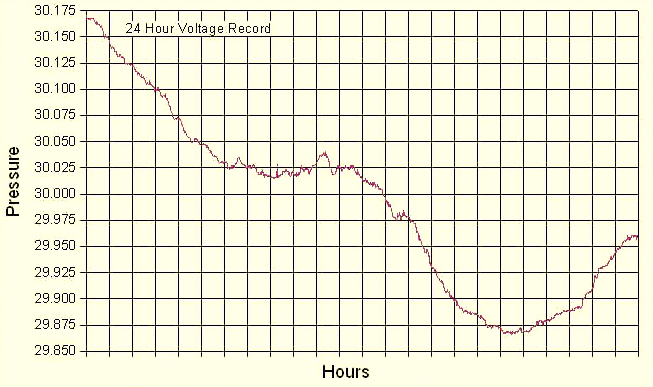
All of the software is free and the hardware is inexpensive! This simple interface can be built right into your project, turning it into a computer peripheral device. As an example, the chart below is a plot of the barometric pressure in Austin over a 24 hour period recorded using this data converter reading an electronic barometer. This chart was created automatically in real time:


That is a pretty nice chart for a system consisting of free software and about $15 worth of parts!

You will need a spreadsheet program to display the data, a program to read data from the data taker and the data taker itself.

The recommended spreadsheet program is part of the free office suite from www.openoffice.org (or buy an enhanced version of the suite from Sun at http://wwws.sun.com/software/star/staroffice/6.0/index.html ). It has the required ability to import and automatically update HTML table data:

Here is how to make your own spreadsheet using openoffice.org that imports data from a table on a web page or html file: Select a cell where you want the data to start and select 'External Data' from the 'Insert' menu. Enter your file path or browse to find it, select "HTML_tables", and set the update rate (I use 60 seconds for the barometer). As long as the file contains something that looks like an HTML table, everything will work fine! The Qbasic program will create a file with the right format. (If you don't see "HTML_tables" or the "OK" button is grayed out, your file does not look like an HTML table.) The power of this feature boggles the mind!

A new Qbasic program interfaces to the data taker. It reads the voltage via a serial port and saves the data to a file in the form of an HTML single column table. Run qbasic.exe to start basic then run the data taking program from within qbasic. Ah, the good old days!

Note: In order to run or edit the basic program, qbasic.exe is required but your machine may not have it installed. If not, you will need to copy it from your Windows install disk. Look for qbasic.exe in a directory with a name like "oldmsdos" and drag it into a folder on your hard drive. GWbasic may work also. You are probably out of luck on operating systems beyond Windows 98. Windows XP doesn't allow such simple communications with the serial port, as far as I know.

Two spreadsheets and the older qbasic program are in a zipped file. You may wish to replace the Qbasic program in that zipped file with a new basic program that makes three files, a 60 minute file, a 24 hour file and a 60 day file. The 60 minute and 24 hour files begin "rolling" once they are full, showing the latest data only (60 points and 24 points, respectively). The three files are much smaller and are easier for the spreadsheet program to handle. This program attempts to automatically set the data conversion speed to 20 seconds and it lets the user select options like com port and calibration coefficients. It also has a few more messages on the screen to let you know what is going on. Make your own spreadsheet using the external data input as with the other program but remember you can't import the data if the file doesn't exist yet (one full day for all three files to appear). Nothing bad happens, just no data appears. For those of you that are using the data taker for other purposes, this program is a good starting point and is easily modified.

The interface is pretty simple:


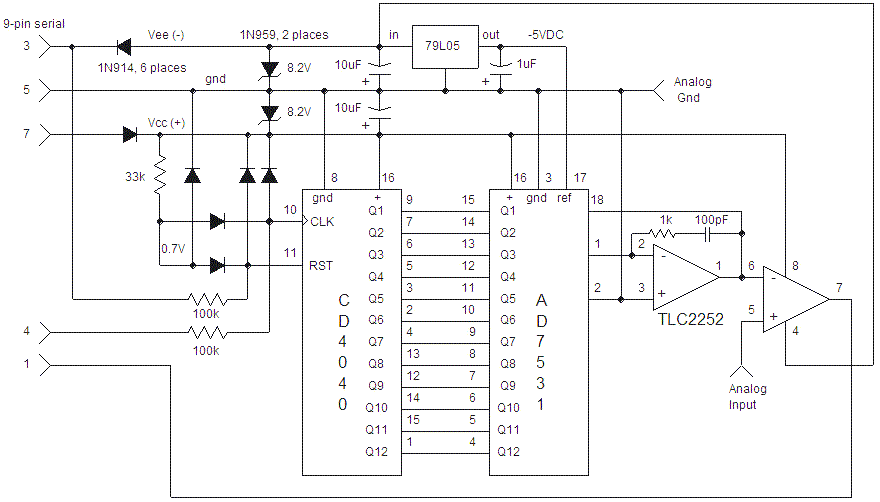
serial port A/D

The jumper arrangement in the prototype allowed for easy testing and may be left out. Sockets were used to simplify experimentation.

In order to avoid using a power supply, power for the circuit is extracted from two of the three outputs on the serial port. One output is set high for the positive voltage (pin 7) and one is set low for the negative voltage (pin 3) by the qbasic program. Two zener diodes are connected from these lines to ground (pin 5) to limit the voltage to about 8 volts to protect the op-amp. The zeners would not be needed if a higher voltage op-amp were substituted as long as it is a micropower device; not much power is available from the serial port outputs. A handful of diodes and three resistors clamp the input voltages to acceptable levels. A CD4040 12 bit counter (Not CD74HC4040!) drives a 12 bit digital-to-analog converter (AD7521,31,or 41) and a low power dual CMOS op-amp compares the output of the D/A to an analog input voltage. The basic program simply advances the counter until the D/A output exceeds the analog input and records the count when it happens. The counting process continues to the end so that each conversion takes the same length of time regardless of the input voltage.

Notice that pin 1 of the op-amp could be used to output an analog voltage. Setting the output is slow since the voltage must be ramped up from zero but for some applications it is perfect. For example, the voltage could control the setpoint of a temperature chamber that slowly ramps between two limits or the speed of a motor or the brightness of a lamp.

Notes:

bullet Reset is accomplished by briefly raising the pin providing the negative supply voltage (pin 3); a 10uF capacitor provides the required negative voltage for this brief period. Using a larger capacitor might be a good idea in case the computer is on the slow side.
bullet The reference voltage for the D/A comes from a negative voltage regulator. The 79L05 is not a precision device and it does drift a bit with temperature changes but for most measurement applications the stability is fine. For more precision use the AD7541 and a better negative voltage reference device (micropower, of course).

Once you see how easy it is to use the serial port, other ideas will come to mind:

bullet An external power supply will free up all three output bits allowing the counter above to be replaced with a shift register for faster "successive approximation" conversions or a "tracking" converter.
bullet The three output bits could control a data multiplexer to multiplex in 8, 4-bit BCD digits from a frequency counter, two 4 digit meters, or other BCD sources.
bullet A low frequency (or divided down) V/F converter could be counted for a time determined by an externally generated clock, perhaps a 10 second gate produced by dividing down a crystal oscillator. The resolution could be fantastic and the V/F is perfect for integration. Don't bother trying to use the computer's internal clock for timing from a Qbasic program - there is just too much variation. But the computer can respond to an accurate external gate quite rapidly!
bullet The spreadsheet can be programmed to periodically save in HTML format to a web server! (see 'options - load/save - general') So your web page could have real-time plots of weather data, background radioactivity, or whatever you dream up. I have not tried this feature and I didn't see a way to set permissions; maybe a password window pops up. I can't imagine an easier way to do some pretty cool live content web pages!
bullet Instead of the spreadsheet importing table data created by a basic program, it could import table data from a server on the Internet, perhaps a table you can control remotely. The contents of the table would be automatically saved by the spreadsheet program and then used by a basic program to control external devices. A professional programmer would probably laugh but it sure would be easy! The spreadsheet and basic program bridge the gap between the internet and your little circuit creation without mind-bending software issues.

Here is how the hardware works:

The serial port (com port) on your computer may be used as an abbreviated parallel port with three pins dedicated to output (pins 3,4 and 7) and four pins to input (pins 1,6,8 and 9). Pin 5 is ground and pin 2 is a serial pin that is not used. These pins are bipolar in nature, with current-limited swings as high as +-12 volts with the negative voltage indicating a logic low. Each com port has an 8 byte Input/Output address range that may be determined by looking at the properties of the com port under the system properties tab of the control panel. Com1 data range is 03F8 to 03FF, for example:


Bit Values

128 - 64 - 32 - 16 - 8 - 4 - 2 - 1


03F8 03F9 03FA 03FB 03FC 03FD 03FE 03FF
x x x x x x x x x x x x x x x x x x x x x x x x x 3 x x x x x x x x x x x x 7 4 x x x x x x x x 1 9 6 8 x x x x x x x x x x x x

We are only interested in 7 of the bits (in red); the bits for the three output pins and four input pins. The red numbers in the above chart represent the serial port 9-pin connector pin numbers. The data in the '64' bit of 03FB sets pin 3, the '1' and '2' bit of 03FC set pins 4 and 7, and the four MSBs of 03FE contain the four inputs from pins 8,6,9 and 1. Using the outputs is quite simple: set an output bit high and the pin goes high. Just read the four input bits to directly determine the logic levels on the input pins. A simple way to get access to these registers is to use the IN and OUT commands in Qbasic. Just remember that each bit has a value determined by its position in the byte. For example, to set pin 3 high, you would output a 64 to 03FB and to read pin 6 you would look for a 32 in the hex value in 03FE ( '32 AND 03FE' will evaluate as either 32 or 0 depending on whether that bit is a 1 or 0). You could set both pins 4 and 7 high by outputting a 3 into 03FC since 3 is '11' in binary. The output bytes may be read back with the IN command to verify that the output data is correct.